Spark Pipelines on AWS EMR
After working on multiple big data projects at work, I decided I wanted to branch out and learn some new skills on my own. Since all I own is my college laptop from 2013, I knew I had to build my own cluster or use a cloud computing platform. I chose to go with Amazon Web Services (AWS).
I was surprised to find that instructions for AWS services were sparse and fragmented. This blog post ties together existing documentation with additional instructions where the existing documentation is sparse or confusing. It starts with creating an AWS account and ends with using EMR Spark notebooks to analyze data stored in S3 buckets. Where appropriate, I’ve linked out to existing documentation rather than rewriting those details in this post.
Sign up for AWS
AWS offers many “Free Tier” services to users during their first year, including 750 hours/month of a t2.micro cluster through EC2 and 5GB of standard S3 storage. While not enough for any large jobs these free services are great for prototyping models with samples of “big” training sets. Link to the signup page: (https://aws.amazon.com/)[https://aws.amazon.com/].
Load data into S3 Bucket
AWS S3 (Simple Storage Service) provides data storage buckets that can easily be connected to EC2 instances for analysis. Pricing is $0.023 per GB/month for the first 50 TB. Data transfer in is always free; data transfer out is free to any AWS services in the same region as the S3 bucket. More information about pricing here.
In this example, we’ll be loading a Kaggle dataset into S3. If you have an existing dataset on your machine that you’d like to load instead, skip to Step 3.
1) Create S3 bucket in desired region following these AWS instructions.
2) Use the Kaggle API to download the dataset. (Adapted from Kaggle API README.)
a) Install kaggle-cli with `pip install kaggle`.
b) Create an API token by navigating to your Kaggle "Account" table and clicking "Create API Token". Download the token to a folder at `~/.kaggle` and name it `kaggle.json`. It is important to follow these naming conventions **exactly** since the API request will specifically look for `~/.kaggle/kaggle.json`).
c) Run the download command:
```kaggle competitions download -c predict-closed-questions-on-stack-overflow```
If you get a response of `403 - Forbidden`, make sure you've accepted the terms of the competition. I was able to trigger the terms page by clicking the "Download All" button next to the API request on the Data tab of the competition page.
3) Install the AWS CLI following these AWS instructions.
4) Set up the installation by configuring it with access keys for your account. AWS recommends creating and Administrator user for these keys rather than using the root user credentials.
a) This AWS page has instructions for creating an `Administrator` user.
b) After creating the user, this page has instructions for accessing your `Access key ID` and `Secret access key`.
c) Run `aws configure` at your command line and enter the keys, default region name (AWS regions list), and default output format (usually JSON).
5) Upload the data to S3!
a) Locate the URL of the upload folder by filling in `bucket-name` and `Region` and `folder-name` in this url:
https://bucket-name.s3.Region.amazonaws.com/folder-name
For example, my bucket url is:
https://stackoverflow-kaggle.s3-us-west-2.amazonaws.com/data.
b) Locate the path to your local data directory (e.g. `~/Documents/data-to-upload`). Make sure all files are uncompressed before upload.
c) Use the following command to initiate the upload:
aws s3 cp source_dir bucket_url --recursive
For example:
aws s3 cp ~/Documents/data-to-upload https://stackoverflow-kaggle.s3-us-west-2.amazonaws.com/data -- recursive
Create EMR Spark Notebook
AWS EMR (Elastic Map Reduce) allows users to process big data across a Hadoop cluster on Amazon EC2 with access to data stored in Amazon S3 buckets. EMR also supports the creation of Jupyter notebooks that run on top of the underlying cluster.
1) Navigate to AWS Management Console, click on the “Services” menu on the top left, and select “EMR” from beneath the “Analytics” category. You can also search for EMR by name.

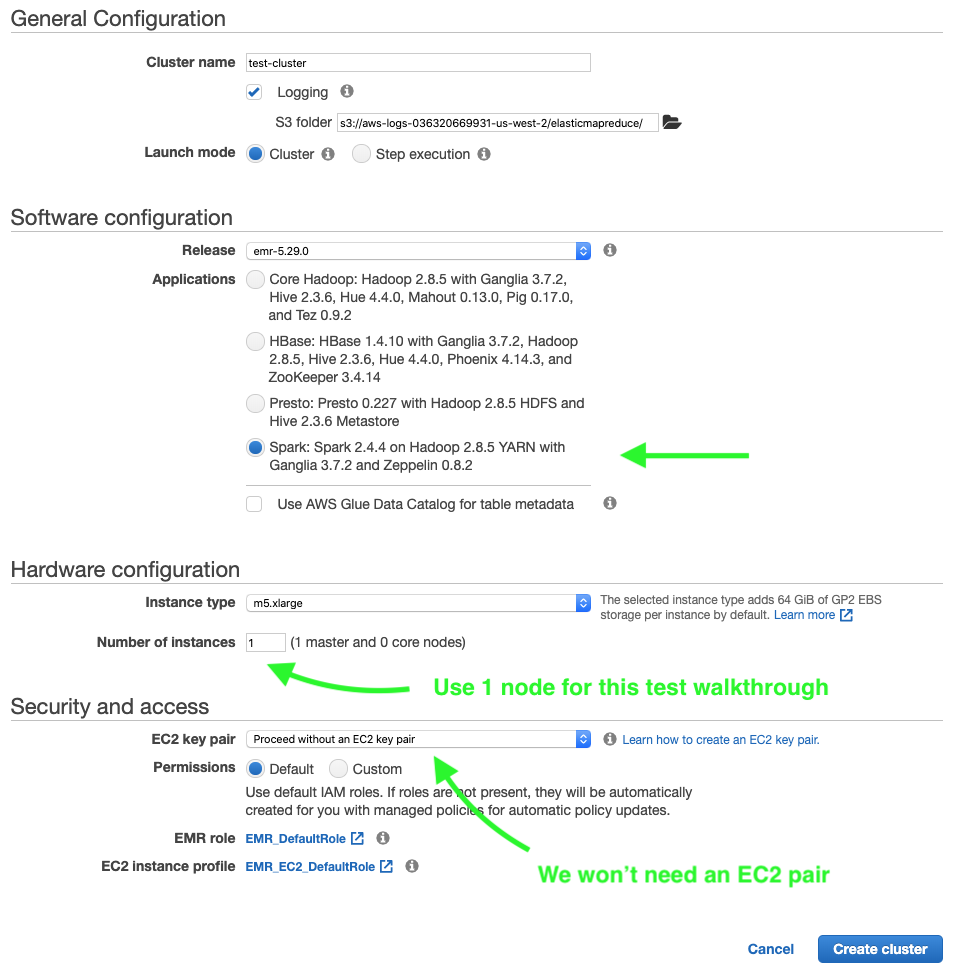
2) Click the “Create Cluster” button, give the cluster a name, and select the “Spark” option underneath “Software configuration”. For hardware, I’m using a single m5.xlarge instance (~$0.20 / hr).
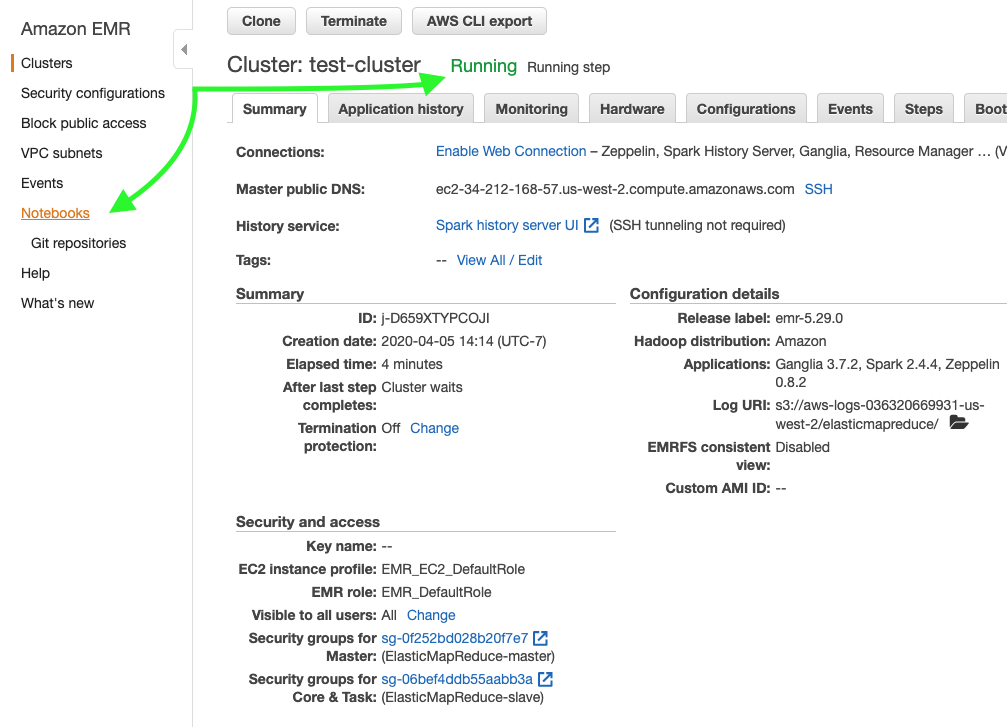
3) After clicking “Create Cluster”, you should be taken to a page with the cluster settings while it spins up. Once the cluster status switches from “Starting” to “Running” (usually 3-5min), navigate to the “Notebooks” menu on the left sidebar.
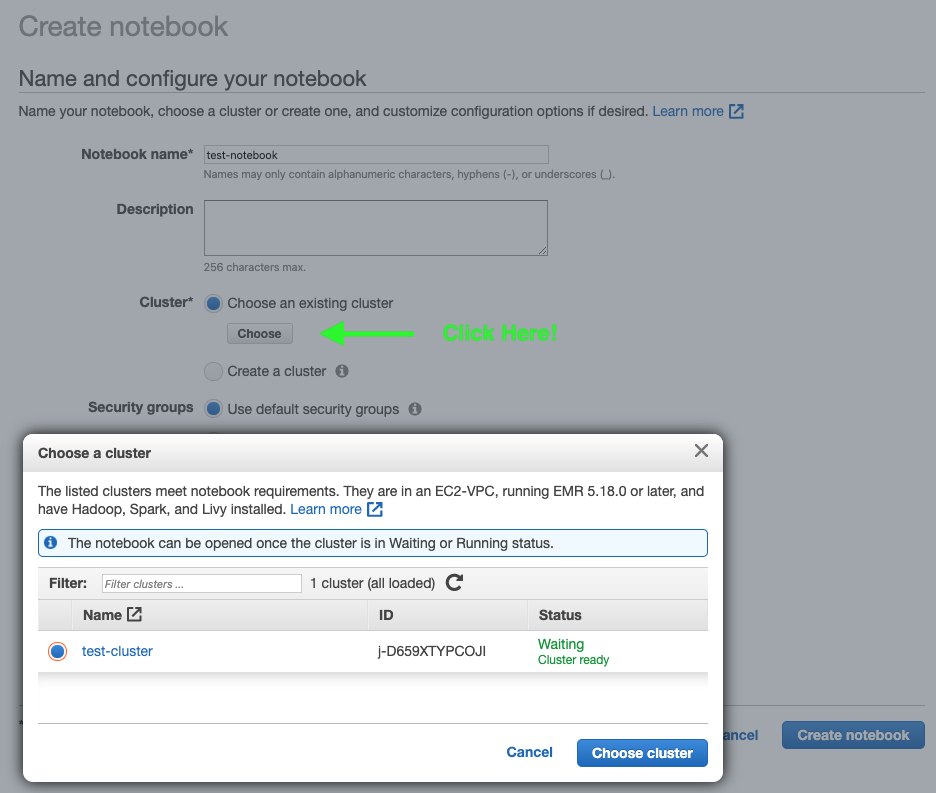
4) Click “Create Notebook” and choose the cluster you created in Step 2.
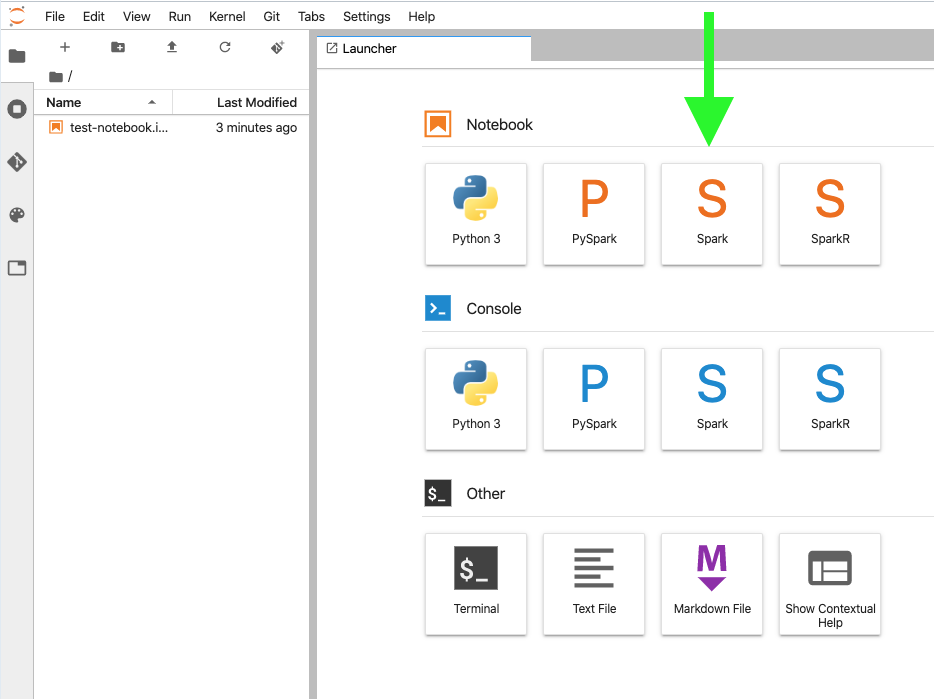
5) Once the notebook has attached itself to the cluster, click “Open in JupyterLab”.
Start Analyzing!
The EMR Spark Notebook that we opened at the end of the previous stage supports four kernels - Python, PySpark, Spark (Scala), and SparkR. For the purposes of this tutorial, I’ll be using the Spark kernel. It should be straightforward to rewrite the following steps in PySpark or SparkR.
1) Choose “Spark” from the list of supported notebooks.
2) Read in data from S3 bucket. Note: this step assumes you created the EMR Notebook and the S3 Bucket with the same AWS account.

3) Import Spark libraries necessary for the analysis you want to do.
I’ve written a notebook using this setup that trains a Spark pipeline with a NaiveBayes classifier. You can find the source code at github.com/ZackBarry/gRowing/blob/master/stackoverflow_closed/predict_status_using_tags_small.ipynb.
Conclusion
I hope that this guide helped get you started with analyzing big data using AWS! As always, feel free to reach out with any thoughts or questions. Look out for my next blog post where I’ll be using EMR and Spark NLP to categorize StackOverflow questions.